
Pax Autocratica Beginner Guide: Your First Stable Loop
Build a readable colony loop before you chase expansion: needs, staffing, flow, research, equipment, then a prepared expedition.

Table of contents
Pax Autocratica asks you to run two machines at once: a colony that must keep working while you are away, and an expedition squad that must return with something worth the risk. The safest first goal is not rapid expansion. It is a stable loop you can read.
The first stable loop
Use this order as a diagnostic sequence, not a minute-by-minute build order. Starting stock, terrain, and balance can move during Early Access.
- Read the colony before placing anything. Identify housing, basic needs, storage, active work sites, and any visible shortage.
- Assign work against aptitude and need. A high work attribute matters only if the colony currently needs that job. Keep at least a little labor free for construction and recovery.
- Make one production chain observable. Confirm input, worker, processing building, output storage, and hauling. Expand only after the full chain moves.
- Choose research backward from a capability. Start with the building, policy, or equipment function you need; then follow its prerequisites.
- Craft for the next encounter. Read firing mode, range, stability, magazine, and alternate fire instead of treating the largest damage number as the whole weapon.
- Leave a colony that can survive your absence. Resolve active shortages, avoid filling every storage slot, and check the work that must continue.
- Enter the expedition with a return rule. Decide what would make you turn back: depleted ammunition, damaged squad, sufficient Core progress, or a colony problem that cannot wait.
Step 1: read needs as signals
A red number or unhappy citizen is an output, not a diagnosis. Ask four questions:
| Question | What it tells you | Next page |
|---|---|---|
| Is the item absent or merely not delivered? | Production shortage versus hauling/storage blockage | Jobs and production |
| Is one person affected or a group? | Individual state versus colony-wide condition | Citizens |
| Did the problem begin after a policy? | Governance side effect or timing issue | Policies and laws |
| Did a new building create the shortage? | New input demand, staffing drain, or output congestion | Buildings and layout |
Fix the narrowest cause first. A colony-wide policy is a costly answer to a single idle workstation.
Step 2: protect labor capacity
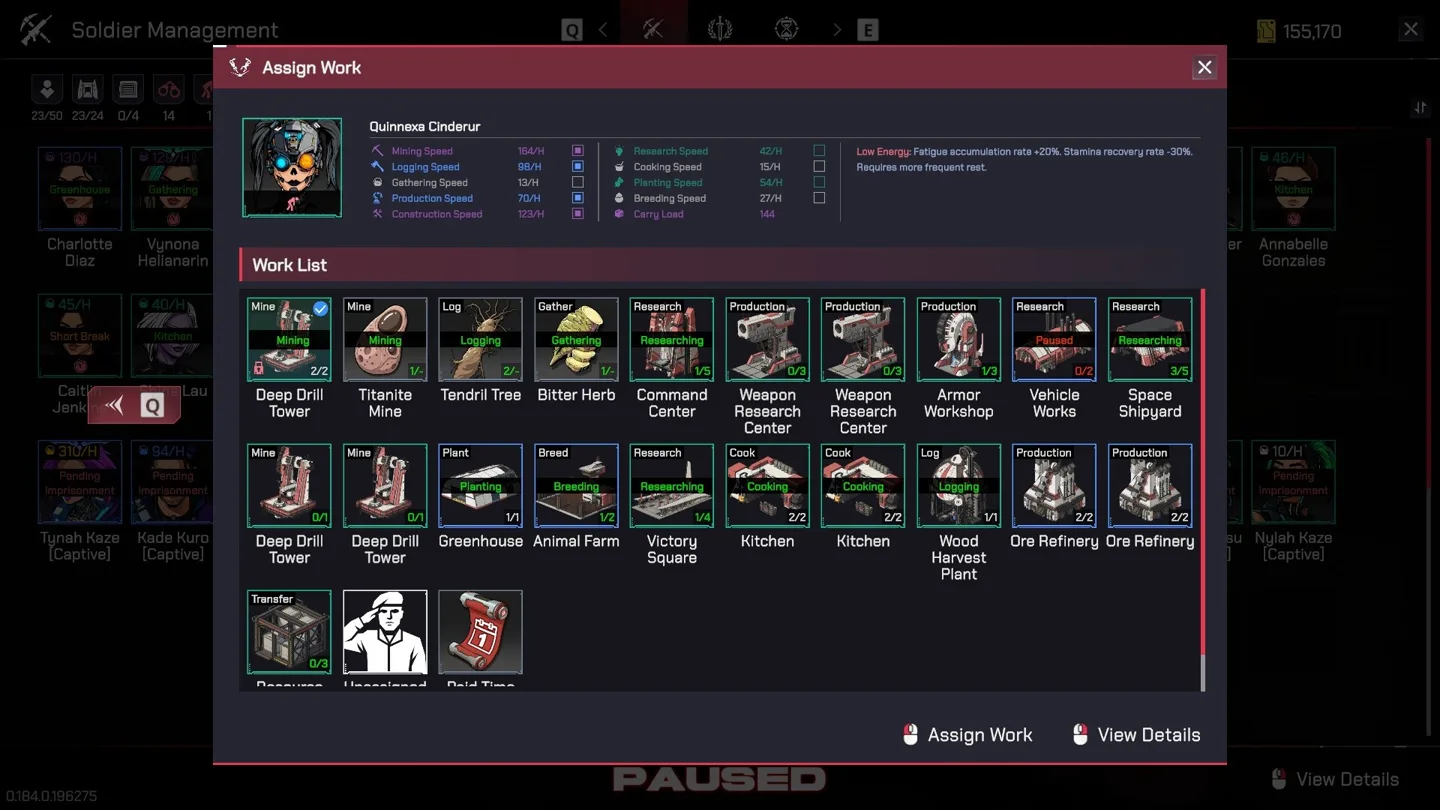
The current assignment view exposes separate attributes for mining, logging, gathering, production, construction, research, cooking, planting, breeding, and carry load. That separation matters: the best researcher may be a poor hauler, and the worker who starts a building does not necessarily operate it.
For the first loop, keep these roles visible:
- Input work: mining, logging, gathering, planting, or breeding.
- Conversion work: production, cooking, research, or a specialized workshop.
- Movement work: carry load and transport capacity.
- Expansion work: construction, with enough spare labor to finish what you place.
If production stops, do not immediately assign another producer. Check whether the producer has inputs and whether the output has somewhere to go. The full troubleshooting order lives in Jobs and Production.
Step 3: research one capability
The research tree is a dependency map. Choose a result—more reproduction capacity, a policy prerequisite, a workshop, or expedition equipment—and trace backward. Compare the displayed research rate and remaining time with your next planned action. Queuing attractive side nodes can delay the capability that actually clears your bottleneck.
The Research Tree guide explains the readable node example and a queue method without pretending the whole tree is already catalogued.
Step 4: prepare a bounded expedition
The expedition screen combines sector identity, progress, enemy strength, Core collection, and an explicit way to end the run. Use those as a dashboard:
- Enter with a weapon behavior you understand, not only a high headline stat.
- Keep squad commands and recovery in mind before a large encounter.
- Treat Core Fragments as build-changing rewards, not a reason to ignore the return condition.
- Reassess after each major objective or spike in enemy strength.

Your first-session exit checklist
You have a usable first loop when you can answer yes to all of these:
- Can you name the colony’s current limiting input?
- Do active buildings have workers, inputs, output space, and a hauling path?
- Is the next research node tied to a specific capability?
- Does your weapon choice match the range and encounter you expect?
- Can the colony continue while the squad is away?
- Have you chosen a condition for ending the expedition?
That is enough. Do not wait for a perfect layout or a complete database. A stable, observable loop gives you the information needed to improve the next one.
Related guides
Jobs and Production: Diagnose the Bottleneck
Match visible work attributes to jobs and trace stalled production from input to worker to output.
Read guideResearch Tree: Read Prerequisites, Queue, and Time
Understand dependency edges, research rate, queue decisions, and a current unlock example.
Read guideExpeditions and Sectors: Prepare, Read, Return
Use expedition progress, enemy strength, Core collection, supplies, and colony risk to make the return decision.
Read guide