
Policies and Laws: A Decision Guide, Not a Tier List
A policy is useful only when its benefit addresses the colony’s present constraint and its cost can be absorbed.
Table of contents
Policies and laws turn colony values into operating constraints. The useful question is not “Which policy is S-tier?” It is: Which present bottleneck does this policy address, what does it cost, and how will I know whether it worked?
Use a four-part policy card
Before choosing, write down four things from the current screen:
| Field | Question |
|---|---|
| Unlock | What research, building, or prior policy makes this available? |
| Target | Which citizen group, job, resource, or behavior should change? |
| Cost | What production, loyalty, time, labor, or flexibility might be lost? |
| Exit | Is the effect timed, reversible, replaceable, or expensive to unwind? |
This prevents a policy from becoming an isolated tooltip decision.
Plan from the problem backward
- Name the blocked player task: food flow, work coverage, reproduction, loyalty, research throughput, or another visible constraint.
- Identify the current cause. A shortage caused by hauling is not fixed by a research-speed policy.
- Trace the needed policy or building through the Research Tree.
- Compare the benefit window with the time required to unlock and absorb it.
- Define a check you can observe after enactment.
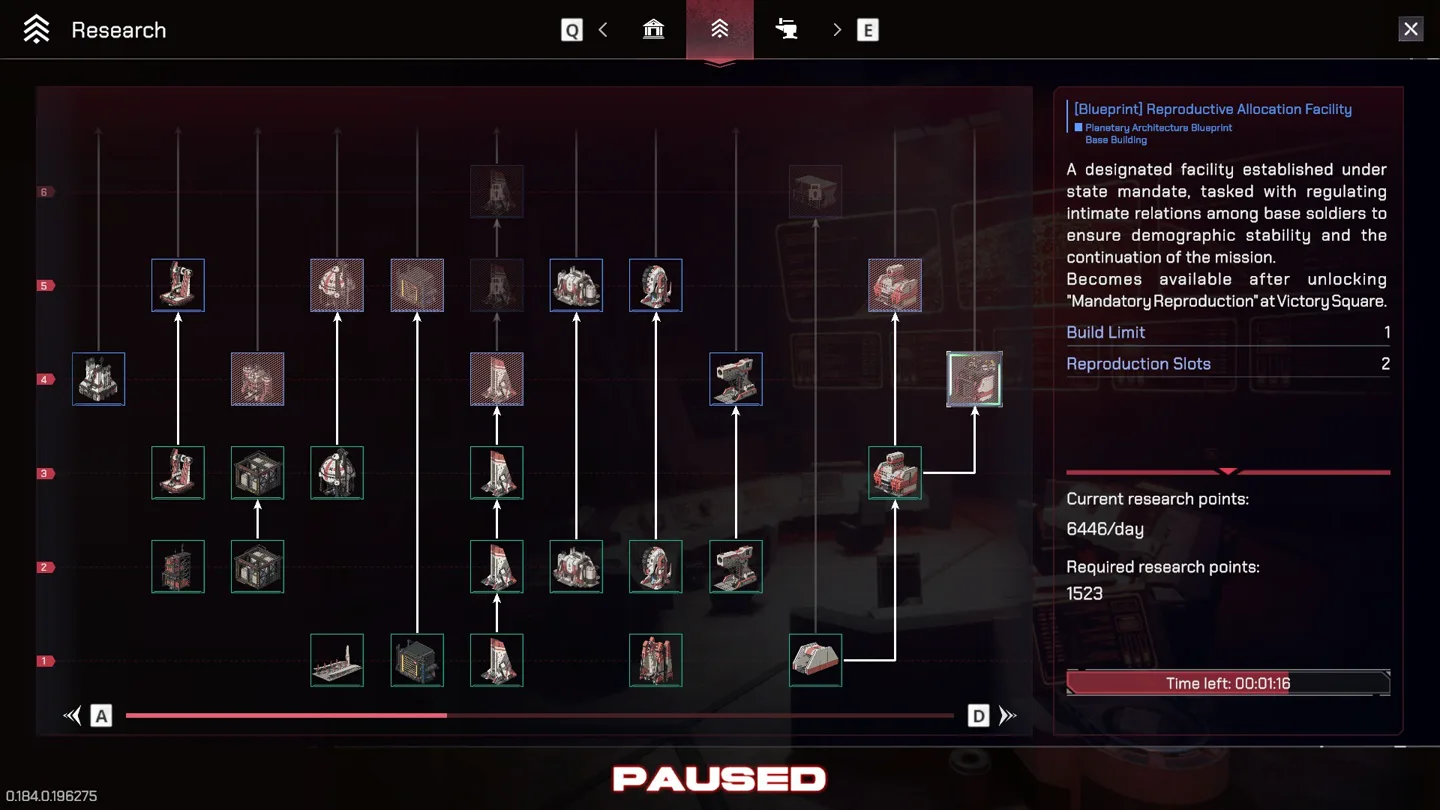
The current research detail for Reproductive Allocation Facility illustrates the dependency pattern: that building becomes available after unlocking Mandatory Reproduction at Victory Square. The selected building detail also shows a build limit of one and two reproduction slots. This is one readable example, not a complete policy catalogue.
Timed policies need an exit plan
24h Paid Time Off is a named example from the final pre-unlock change set. Its most useful lesson is structural: a timed policy creates a before, during, and after state.
Before activation:
- confirm which work can pause or be covered;
- protect food, hauling, and other continuous needs;
- note the citizen condition you expect to improve;
- avoid starting a construction or expedition plan that assumes normal output.
During the effect, watch the intended citizen signal and the cost to production. After it ends, restore assignment deliberately rather than assuming the colony returned to its old balance.
Exact duration, availability, and effects can change in Early Access. Use the current tooltip for the action; use this page for the decision frame.
Policy mistakes and the smaller correction
“The policy is unlocked, so I should take it”
An unlock is an option, not a requirement. Leave it until the benefit answers a real need.
“More fear solves unrest”
Fear, loyalty, relationships, needs, and work are connected but not identical. Return to the three-level diagnosis in Citizens.
“Production fell, so the policy failed”
Maybe—but first distinguish an expected tradeoff from a broken production chain. Use the Jobs and Production order: input, hauling, storage, worker, output.
“A popular policy is always good”
Another colony’s layout, population, policy stack, and expedition timing are different inputs. Copying the outcome without those inputs is not a strategy.
A practical policy decision sheet
Use this compact template while playing:
- Blocked task:
- Observed cause:
- Candidate policy:
- Prerequisites:
- Expected benefit:
- Expected cost:
- Affected jobs or citizens:
- Check after activation:
- Fallback if wrong:
If the “observed cause” or “check” lines are blank, wait. That pause is often cheaper than enacting a powerful rule into an unreadable colony.
Related guides
Citizens: Fear, Loyalty, Relationships, and Rebellion
Read citizen signals, isolate the cause of unrest, and choose a government or production response.
Read guideResearch Tree: Read Prerequisites, Queue, and Time
Understand dependency edges, research rate, queue decisions, and a current unlock example.
Read guideJobs and Production: Diagnose the Bottleneck
Match visible work attributes to jobs and trace stalled production from input to worker to output.
Read guide